Saturday, September 24, 2011

making my way back

feels like it's been forever since i've been here - probably because it has been.  life gets pretty hectic for me in the fall, as the hats really take over my life.  i did two wholesale shows this summer, and now i'm in the thick of things - having to actually send out those orders.  the administration side of that is in itself a full time job, so keeping up with that, while actually having to make all the hats, well, it's keeping me busy.

but it's also such a great time of year for local dyestuffs, and i've snuck in a few dyeing moments over the past few weeks.  one of the most exciting things, for me, was a surprise visit from one of my art school teachers, coby, who was the woman who introduced me to natural dyeing.

coby lives in the kootenays, in bc, where i went to art school, but was in ontario to see family, and was keeping a 'journal' of her time here through dyeing.  each place or person she visited, she would gather some wild dyestuffs and bundle it all up in a small square of silk, sprinkle the silk with alum water, and bundle it all up.  she plans to create some sort of art piece with it when it's all done.

here is miss coby herself, bundling away on the deck at my cottage


and here are some of her bundles from some of her other spots along the way.  i love how they look like little cocoons of colour


and the bundle to be that represents her time with me in port ryerse - a very fitting one i think, as the property at the cottage is bordered by a huge trumpet vine (the red flowers) at the front, and an enormous, ancient black walnut tree (the green ball) at the back.


i myself did a bunch of bundling with my mom a few weeks ago - have been too busy to even unwrap them yet, but hopefully will do that this weekend, and will be back soon to show you the results.......

Friday, August 19, 2011

book report: wild colour

i've been on a bit of a travelling roadshow lately with the hats, and haven't had a chance to do much dyeing.  but fortunately i'll be working for the next couple weeks from the little village i grew up in, and this time of year is fantastic for gathering local wild dyestuffs.  and i will.....

in the meantime, i wanted to put up a little natural dye book report of sorts.  over the years i've collected quite a few natural dye books, so i thought i could share little mini-reviews of my favorites with you.

i'll begin with wild colour, by jenny dean, which is one of the two dye books that i use the most, and recommend the most when people ask me.  my copy is older, i think there is a new edition with a different cover.


i think it's really the best all around natural dye book out there, and has clear instructions and great photos for most everything you might want to know as a beginner dyer, including several things you don't see in other books, like how to make your own mordants:


and also great experiments to try, such as this one, making 25 different colours from one dyebath:


the second half of the book lays out one page per dyestuff, and as the title suggests, it focuses on many dyestuffs that can be found in the wild.  of course, this depends a lot of where you live (the author lives in england), but many (though certainly not all) of the dyestuffs listed are things that i can find in southern ontario.  some, like goldenrod, are abundant right here in downtown toronto (right now!):


my only real complaint with this book is the kind of colour swatches that are used to demonstrate the potential colours within a dyestuff.  almost all dye books i've seen use photos of actual fibres which have been dyed.  in this book, it's a kind of pantone colour swatch, which i find can be a bit misleading.  for example, if anyone has ever been able to achieve such beautiful shades of soft pink using birchbark, like the swatches shown, i'd love to see them.  in my experience, you're more likely to get a range of browns with pink undertones.


but all in all, this is one of my two most valuable natural dye resource books, and i highly recommend it.  back soon with some actual dyeing!
 

Friday, August 12, 2011

kitchen vignettes

my lovely and very talented housemate aube has recently started a food blog, called kitchen vignettes, which you really should go check out.  aube is not only an incredible cook and lover of all things food, but she's also a super talented filmmaker and photographer. (you may remember she helped me out here.)   her blog combines her two passions, and she has some wonderful video-recipes postedi absolutely adore the garlic scape pesto video, for the sheer beauty of it, but i also love the quiet hilarity of her most recent chicken soup video (in which you may spot a cameo by a familiar face). 

aube's name is.....well....aube, but she is often given the nickname aubergine, hence the title and header, and all the beautiful photos she's done of that particular purple plant, like these ones:


feeling pretty lucky to live in the house where all these recipes are being created.....

you should also check out this post by sweet carolanne, who has got some rockin japanese indigo plants going.  i'm sad to say that the indigo plants i started haven't faired nearly so well.  my garden is full of beautiful tomatoes and herbs, but alas, the dye plants haven't shot up alongside them.  i may try to start some indigo seeds indoors, using the tutorial carolanne mentions.  i know they need the heat of the summer, so it may not work, but i figure it can't hurt to try.....

Tuesday, August 9, 2011

dusk dances

i've had a strange (and quite terrible cold) for the last week or so, and have been laying pretty low, but i did make it to dusk dances, one of my all time favorite toronto summer events.  every year it's different and every year it's amazing, and i love that it happens in withrow park, which is right around the corner from my house. 

this year there were five different scenes, and another thing i love about dusk dances is how between each dance you up and move to a different part of the park.  the audience was huge when i went this year, and there's this great excited energy as everyone hurries and jostles to get a good spot to watch each scene.

one of my favorites this year was this performance, which i don't think i can describe better than the photo can:


but my absolute favorite were these gals, who were playing 1950's prom attendees, who started out really sweet and went a bit psyco by the end (all through dance, of course):


dusk dances is still on tour, you should check it out to see if they're coming to a park near you.  

summer is such a wonderful time for these small festivals - tonight i'm going to see a summerworks play "the intruder" that my friend clare did the movement direction for, and thursday i'll see another summerworks show "one" that my friend keith is in. both have been getting some great reviews.

and keeping all this summer festival-ing rolling - i just discovered that the edmonton fringe fest will be on when i'm there for a wholesale show next week. so excited! the edmonton fringe is legendary, and i think it will be a perfect way to spend my evenings after the show.

have you seen any great shows or festivals this summer?  do you have a favorite event that you make sure to catch every year?

Wednesday, July 27, 2011

back (for a while now) from charm city

i'm a terrible blogger these days.  my only excuse is that it's summer, and that summer is short and i try to spend as much of it as possible away from the computer, and if possible, away from internet access all together.  i think it's a pretty good excuse.

been back from baltimore for a couple of weeks, it was a good trip - my first wholesale show and i learned so so much about that particular world.  and have a bunch of new stores for the hats too.....

baltimore was an interesting city - i joked before i left that all i knew of it was john waters and the wire.  and it turns out that there are definitely parts of the city that actually reflect those two very different realities.  the downtown seems a bit struggling, seems like one of those cities where a lot of people have made a run for the suburbs, and the downtown is left a bit barren and not taken care of.

but the best thing about baltimore was learning why it's called 'charm city'.  and it's because the people are the friendliest, most outgoing of anywhere i've ever been.  we canadians have a reputation of being friendly, but i think what we are is polite, or nice even.  we're actually quite reserved.  the time i spent in france i thought the same thing of the french - everyone is all 'mademoiselle' this and 'je vous en prie' that.  polite to the point of formal even.

but baltimore?  in baltimore they're friendly.  it's different.  i have never had so many strangers speak to me on the street, in a store, in the elevator, everywhere.  everyone is talking to each other all the time.  the amount of times i got called 'hon' in one day?  quite something.  when i returned home i was definitely happy to be back in toronto, but it did make me a little sad to be back on a silent streetcar, everyone staring into their phones, ignoring each other.

a highlight of the trip was a visit to the american vistionary art museum.  an incredible place.  out front you're greeted by trees covered in mirrors


and an entire bus covered in mosaics and flowery creatures like this little bunny:


and all sorts of other weird and wonderful.  can you imagine having this bird's nest balcony for your apartment?:


the exhibit that was on was called "what makes us smile" and it was incredible.  at the risk of exposing my juvenile sense of humour, i'm going to go ahead and admit that my favorite thing there was this:


a bench covered in whoopee cushions!  it was in a room called the 'toot suite', which was, well, a room dedicated to.....fart humour.  which is hilarious.  and the bench was too much - someone would sit on it, it would make it's noise, and you couldn't help but to laugh.  i saw people trying not to laugh.  but they couldn't.  they all eventually broke down.  who can help it? farts are funny.

on that note, i'll leave you with this......


Thursday, July 7, 2011

a rainbow in the shop

over the long weekend, my very very helpful super duper mom and aunt helped me skein up a bunch of the wool that i've been dyeing here and there over the spring.  i spent this afternoon photographing everything, and now it's all available in my shop.

all of the yarn is 100% superwash merino wool and dyed with either plant or insect dyes.  it's a beautifully soft yarn, and the perfect gauge for a variety of projects.

unknowingly, i had dyed up a real rainbow of colours, so i couldn't help taking a bunch of shots of the wool arranged as such.


Wednesday, July 6, 2011

tips for charm city?

i keep meaning and keep forgetting to put a call out to you all.  i'm heading to baltimore this weekend for the buyer's market of american craft, and though i have apparently been there once when i was ten years old (for a blue jays vs. orioles game, back in the days the sindens used to bop all over the states for the blue jays???), i don't have much memory of itmy current picture of baltimore is a mix of john waters and the wire, which is obviously not very balanced.  a quick perusal of the design sponge guide and the city paper online has shown that there seems to be a lot of great stuff going on in baltimore, and i'm super stoked to go check some of it out.

anyone know baltimore well? anything i really should see/buy/eat/do?  a great neighbourhood to hit?  neighbourhoods to avoid?  any advice is much appreciated.  thanks team!

Tuesday, July 5, 2011

dining before and after

my husband and i bought our first home a year ago january, and this summer is the first that we've had a chance to really do anything at all to the backyard.  we really wanted to make it a little oasis in the city, somewhere that we could linger over late summertime dinners or spend a saturday afternoon in the hammock with the paper.

i wanted to have a really great table out there, for said dinners (we live in a house full of great cooks, so the kitchen and the table really are the heart of our home), but i was also on a budget, so i ended up revamping a table that was a curbside score (toronto is an amazing city for this), along with some chairs that the previous owners of our house had left behind.

here is the before shot.  my supervisor is clearly not impressed.


a few coats of paint, some great fabric and an umbrella, and voila:


i used nani iro oilcloth that i got at the workroom for the seats.  i adore this fabric. karyn just got a bunch more of the line in cotton gauze - her photos always make me want to rush in and fabric horde.

 our backyard is even more magical right now, since the mock orange is blooming.  the entire tree is covered in white blossoms that smell amazing.
 and when the wind blows, the petals fall and it feels like it's snowing.  snowing beautiful, fragrant petals.  it's lovely.


Tuesday, June 28, 2011

ready to dye

if any of you started a natural fermentation vat of your own, by now it may be ready to dye. 

the vat is ready when all (or at least most) of the oxygen has been reduced out of it.  indigo dyeing is quite magical - the actual dyeing takes place not in the vat, like an immersion dye, but when the fibres are lifted out of the vat.  the oxygen hits them and they turn blue.

the first sign that things are going well with your vat is that you will have a kind of coppery sheen on the top of it - this may happen in the first few days even.  you know how gas spilled on the sidewalk has kind of a rainbowy, shimmery quality to it?  like that.

but to know that your vat is actually ready to go, simply take up a small scoop of the liquid in a clear container.   when healthy, the vat liquid will no longer be blue, but a greenish, yellowy blue, or if very healthy, amber.  jim liles always describes the colour as dark beer colour.

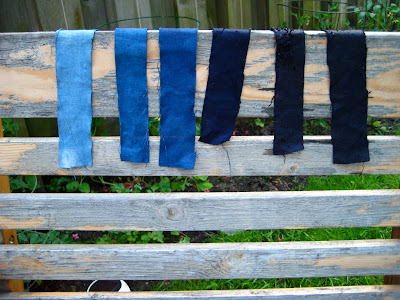
and of course the ultimate test is to stick a piece of fabric in there.  i have a pile of the selvedge edges of white fabric that i use to test my vats.  stick a piece of fabric in there, and after a few minutes when you pull it out it should be a bright, vibrant, sometimes almost neon green.  and then the magic.  the colour will slowly shift before your eyes and become the beautiful blue that is indigo.

i tried to take a photo to show this, and didn't have too much luck, since the colour shifts pretty quickly, but you can get a bit of the idea here.  the fabric on the left has only just began to turn blue, while the piece on the right is fully oxydized.


if you take your fabric out and it is already blue, or the liquid you take up in a container is still blue - your vat is not ready, and the dye will not stick.  the oxygenation process has to happen.


in other types of vats, like the zinc-lime, another sign of health is that a 'flower' forms on the top of the vat.  this will depend partly on the size of your vat - when i did my very tiny glass jar, the surface of the vat was quite small and i would only have a few little bubbles on the top.  but now that i have a bigger vat going, i've also got quite a nice little flower happening:


but, i will note that the flower on my fermentation vat is much smaller (about 2 inches across), then the one on my zinc-lime vat (about 5 inches across), even though the vats are now the same size.  photos of my zinc-lime flower, by much more skilled photographers than me, are here and here.


fingers crossed that your vats are happy!

Friday, June 24, 2011

photo shoot

i'm getting ready to go to the states for a wholesale show in a few couple weeks (with my hats, my full-time gig), and have been busy preparing.  it's going to be my first wholesale experience so i'm a little nervous, and hope that i have the right answers to any questions.  i'm also struggling to create a booth that i can fit in my suitcase....

we had a little photo shoot the other night with some of my newer products, the ever-adorable rosalyn as model, and my fabulous housemate aube as photographer.  we started with a bunch of shots of hats, but we had been struggling to come up with a good way to get photos of my mittens that wouldn't be just a static shot of hands or the mittens on a backround.  and so.....


kind of ridiculous.  but i love it.  now it feels like it needs to be some kind of animation.  which is clearly not going to happen.  but still.

one of my favorite shots from the night is also my new favorite product, this braided scarf:


super mega-thanks to aube and roz! 

Thursday, June 23, 2011

questions


figured i would pop in quickly and answer the two questions that came from the last post, here, rather than in the comments sections.

nicole asked about the daily stirring - concerned that it would introduce oxygen into the vat, which is of course exactly what you're trying to avoid.  i do what my instructor in art school taught me, and what i saw a very experienced indigo dyer in japan do - stir in a circular motion with a (very long) spoon that reaches to the bottom of the pot.  this way, the spoon is mixing up the sludge that has settled at the bottom (which is the point of the stirring - to reintroduce the mix into the water to allow the chemical reactions to continue happening).  and as you stir you begin to create a whirlpool - not only does this mix things up fairly aggressively without adding too much oxygen, but once you have a flower forming, the whirlpool helps to bring the flower back together into the centre of the vat.

i agree with margie that it's good to do your stirring at the same time each day - then it just becomes part of your regular daily routine.  i do mine first thing in the morning - feels like a little check-in to see how they're doing....
 and heleen asked if it was possible to use a big plastic bucket to make a vat in, which it definitely is.  you can use any type of vessel you like.  preferably one with a lid, to help keep both the air out and the smell in.  currently both my natural fermentation and my zinc-lime vats are in 5 gallon plastic pails, the kind that a contractor or painter might use. 

the main consideration when choosing a vessel is what you're going to dye.  i had my fermentation vat in a smaller container (a stock pot), but then when i would dye large skeins of wool, the wool was too big and would touch the sediment at the bottom of the pot, mixing it all up, which you don't want to do while dyeing.  your goods will not only get a bunch of unreduced indigo on them, which will make them look darker blue than they are but will then wash off when you rinse (and waste the indigo), but once the liquid gets too stirred up, you have to stop and let the sediment settle again, which takes at least two hours.  so choose a vessel that is big enough that your fibres can go into it without touching the bottom two inches or so of the vat.

the other consideration is keeping the vat warm - the advantage of a stock pot or other metal vessel is that you can just plunk it on the stove to warm it up.  but this time of year your vat shouldn't need any additional warming - summer room temperature will be more than enough.  however come winter, a plastic vat will be harder to keep warm, and alive.

there's many wonderful photos of indigo dyers in warm climates, who have their vats built right into the ground, like this man in india:


photo from here

Monday, June 20, 2011

natural fermentation recipe


so i promised last time that i would detail out how i made the natural fermentation vat that we used at our dyeing party last week.  the recipe i used comes from cheryl kolander at aurora silk and you can find it right herethere is also a very similar recipe in "the art and craft of natural dyeing" by jim liles, which is one of my two natural dye bibles that i refer to all the time.  he has several indigo recipes, including old fashioned sig vats, which use just indigo and urine.  but i am nowhere near that hardcore.  and my vats are already stinky enough, thank you very much.


in any case, as i said, the recipe is very simple.  for my medium sized vat, which i did in a big stock pot (holds around 2 gallons, or 7-8 litres) i combined:


warm water, almost to the brim
50 grams of finely ground indigo
28 grams finely ground madder root
28 grams regular old wheat bran
170 grams soda ash


stir very well (especially when you add the indigo - it is notoriously tough to dissolve), put a lid on it (important, as the point is that you're trying to reduce the oxygen out of the vat), and put in a warm place.  


and that's it!  the key is that you have to look after it a little bit, but all this means is that you need to stir it once a day (quite well), and make sure it stays warm.  as i said, when i did this vat in the winter, it took almost 6 weeks to be ready to dye, but the vat that i started recently and have been keeping in a warm attic only took 5 or 6 days.  


gotta run to teach a class at the workroom (felting this time!), but i'll come back in a day or two and talk about how you know that your vat is ready to dye.


any questions so far?

Friday, June 17, 2011

dyeing party


had a little dyeing party in the backyard last night.  we had trouble getting the zinc-lime indigo vat going in the advanced dyeing class at the workroom, so i had promised the students that once i got mine going at home, i would invite them all over for some dipping.

and it was even better, because since then i have also gotten my natural fermentation vat going.  the mini one that i wrote about a few weeks ago worked out so well that i started up a second, slightly bigger one.  i had only ever done a natural fermentation vat once, years and years ago, and i had never really been motivated to do it again, since that vat took a really long time to be ready (six weeks!), and even then wasn't very strong.  but i now realise that the problem wasn't the vat, but the time of year.  last time i tried it was winter, and i struggled to even keep my vat at room temperature, just like my zinc-lime vat this past winter.  

but.....now that it's warm, and i've got my vats up in my (cooking hot) attic studio, everything is coming up blue.

the natural fermentation vat is really quite easy, and last night we were getting some beautiful blue in a wonderful range of intensities.  i linked to the recipe that i used a few posts ago, but i'll come back soon and do a post with more details of how i made my vat, and perhaps some discussion of the different types of vats.

but first, some photos of our dyeing fun:


it was lovely to see the backyard all covered in fabrics and yarns in various stages of dipping and oxydizing.


one of my favorite parts of shibori is the 'reveal', when you unfold the fabric and see what kind of design you've created.  this is karyn's lovely window pane piece.


susan put on a pot of cochineal and added some lime juice to it.  the acid from the limes brings out the red, especially on wool.  i dyed the ends of a few skeins of superwash merino to create some new variegated colourways that i'll have in the shop soon.


the evening was overseen by my trusty studio assistant, who managed to escape the fate of indigo dipped paws.

it was a great night, so much fun to be dyeing in a group like that.  arounna has posted some lovely photos, including one of the indigo flower on top of the zinc-lime vat (which is how you know your vat is ready to dye).


Tuesday, June 14, 2011

solar scarves in the shop!

after nicole posted some lovely photos of herself wearing the solar dyed scarf she won in my giveaway, a few of you wrote to ask if there were any more available.  so i've been bundling and waiting, bundling and waiting, and have just listed a few solar scarves in my shop.

the process requires a bit of patience, since the dyes are set with only the heat of the sun, and so need to be left to 'cook' for at least a week or so.  but it's so satisfying to open the bundles up for the big reveal.  as per usual, i don't feel like my photography skills do the colours and details in the patterns justice, but i'm working on it.....


Tuesday, June 7, 2011

cathedral windows

a few weeks ago i decided to treat myself to taking a class at the workroom, the place where i teach dyeing.  cathedral windows patchwork had long been on my list of things to try, so i was thrilled when it was added to the fantastic roster of classes at the workroom.  i'm not much of a quilter, i've only done a few pieces in my life, but i find it very satisfying and the results can be so stunning.   

whenever i do any patchwork i always gain a new appreciation for those who are so good at it (including johanna, the fabulous quilting instructor at the workroom), since it's an art that requires such precision.  this kind of meticulousness is not really my strong point, but i have found that even though my patchworks always end up a bit wonky, i'm still usually pretty happy with them.


the cathedral windows technique is a bit fiddly, and requires a decent amount of handsewing, so my piece is only going to be this big - four squares by four.  i think i'll make it into a cushion.  it would be lovely to make a piece like this which showcased a gradation of colours made with natural dyes, wouldn't it?

Tuesday, May 31, 2011

back to the blue

i had basically put my zinc-lime vat on hold completely, since i was having too much trouble keeping it warm enough.  i never thought that it would be the end of may before we actually felt some sustained warmth here in toronto, but that has been the (grey, dreary, rainy) case.  

and now, finally and suddenly we have seemed to have skipped spring and headed right into the heat of summer.  i took this opportunity to revamp my vat, and also to move it to my third floor studio, which is suddenly hot as an oven.  after just one day there is already a flower forming on the top of the vat, so i'm pretty hopeful that the heat is going to be just what my fussy blue friend has been wanting all along.

inspired by this post by eva, i've also started a small fermentation indigo vat, which uses wheat bran, ground madder and soda ash as the reducing agents.  i had one of these types of vats going years ago when i was in art school, but it didn't survive my move back across the country.

for some reason my instinct is to create giant vats of indigo, perhaps a leftover from when i was dyeing large skeins of wool for weaving. but i liked how eva's vat was so small - it makes it somehow seem more manageable, so i've followed suit and done just a small jar which can sit happily on my desk.


i used cheryl kolander's recipe from aurora silk, and just scaled the ingredients down proportionally.  it's the same recipe i used last time i did a natural fermentation vat, and while i did have success, i found that it took my vat more like six weeks to be ready to dye, rather than the one that she lists.  but it only requires a little stir every day so it's pretty low maintenance. i was sure to use a vessel with a lid that seals, since i learned last time that this can be a bit of a stinky venture.

Friday, May 27, 2011

more bundles

kind of obsessed with the solar dyed bundles right now.  i was really pleased with the results from the one i did at the workroom, so i put a few more together last week, and just opened them up yesterday.  i'm making a bunch of shibori scarves for a couple of my retailers, so i'm also going to put on some more bundles for them as well.

my favorite is this one, where i used some cochineal bugs that i had already used to make a dye extract with, some blackberries, and a little bit of osage.  i love the peach and purple together, and how a design is formed where the fabric was folded over on itself.


i did another one with blackberries which got all mouldy.  not exactly sell-able anymore, but the designs produced by the mould were actually quite beautiful, even if there's not really anything i can do with this one.


and finally there's with onion skins.  i like the way it turned out, but feel like it needs a little something more.  that's one of the things that i love about dyeing, is how you can continually add layers of colour (and texture) by overdyeing. i've had times where i was completely dissatisfied with the way something turned out, but then overdyed it to become a favorite.   i think i'll bundle this one back up with some more, new dyestuffs.